Difference between revisions of "HowTo SSH Keys"
Jump to navigation
Jump to search
Add public key to the destination repository (e.g.
Add private key to the source repository (
| Line 8: | Line 8: | ||
# You now have two files: <code>id_github_sigrokorg</code> (the private key) and <code>id_github_sigrokorg.pub</code> (the public key) | # You now have two files: <code>id_github_sigrokorg</code> (the private key) and <code>id_github_sigrokorg.pub</code> (the public key) | ||
== Add key to the destination repository (e.g. <code>libsigrokflow</code>) == | == Add public key to the destination repository (e.g. <code>libsigrokflow</code>) == | ||
# Go the the | # Go the the Github page of the repository in question (e.g. https://github.com/sigrokproject/libsigrokflow) | ||
# Click on "Settings" (repository settings)<br />[[File:destination_settings.png]] | # Click on "Settings" (repository settings)<br />[[File:destination_settings.png]] | ||
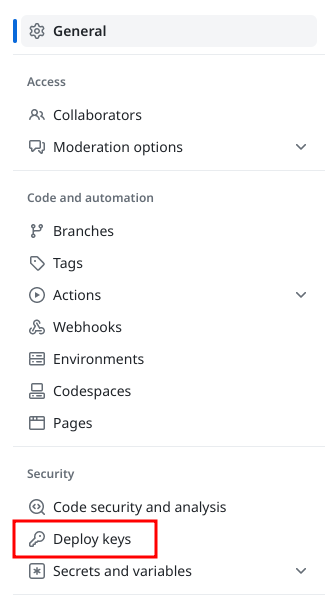
# Click on "Deploy keys"<br />[[File:destination_deploy_keys.png]] | # Click on "Deploy keys"<br />[[File:destination_deploy_keys.png]] | ||
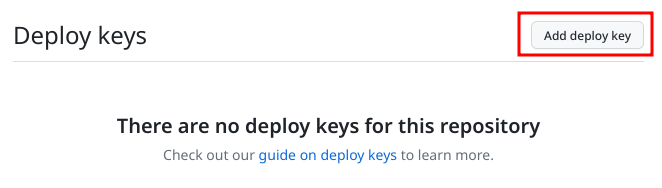
# Click on "Add deploy key"<br />[[File:destination_add_key.png]] | |||
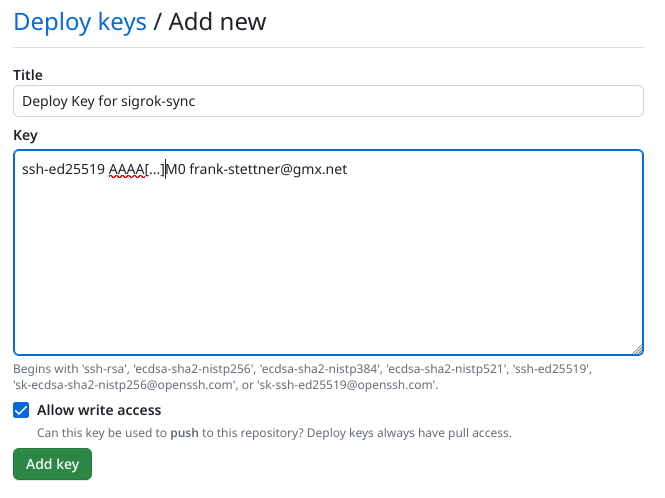
# Enter a title, e.g. "Deploy key for sigrok-sync" | |||
# Paste the content of the <b>public key</b> into the "key" text area | |||
# Select "Allow write access"<br />[[File:destination_add_public_key.png]] | |||
== Add private key to the source repository (<code>sigrok-sync</code>) == | |||
# Go the the Github page of the <code>sigrok-sync</code> repository | |||
# Click on "Settings" (repository settings)<br />[[File:source_settings.png]] | |||
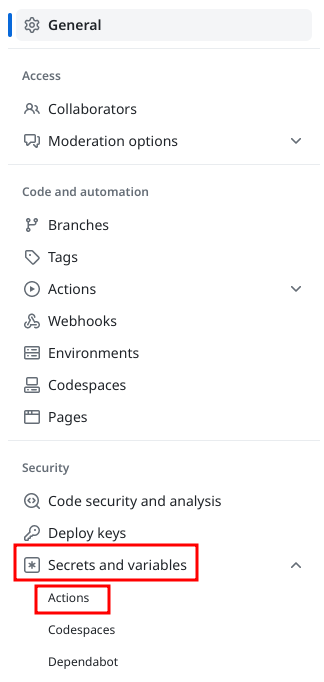
# Click on "Secrets" and then on "Actions"<br />[[File:source_secrets.png]] | |||
# Click on "New repository secret"<br />[[File:source_add_key.png]] | |||
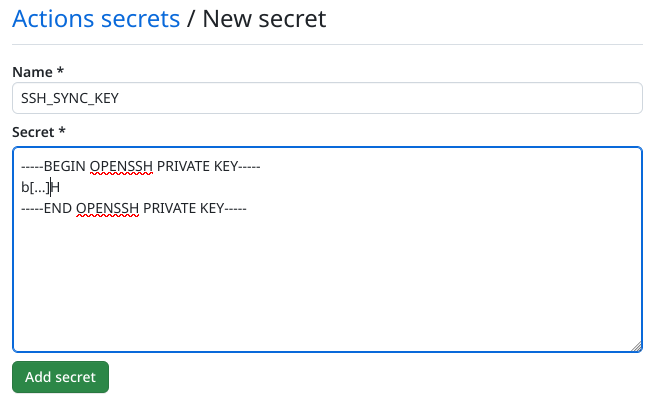
# Enter a name (Name is used in the Github workflow): <code>SSH_SYNCY_KEY</code> | |||
# Paste the content of the <b>private key</b> into the "value" text area<br />[[File:source_add_private_key.png]] | |||
Revision as of 18:39, 2 April 2023
Generate and deploy SSH Keys to Github
Generate the keys
- Generate key
$ ssh-keygen -t ed25519 -C "your_email@example.com"
- Name the file
id_github_sigrokorgand store it somewhere in your home directory (e.g./home/frank/.ssh) - Don't enter a password
- You now have two files:
id_github_sigrokorg(the private key) andid_github_sigrokorg.pub(the public key)
Add public key to the destination repository (e.g. libsigrokflow)
- Go the the Github page of the repository in question (e.g. https://github.com/sigrokproject/libsigrokflow)
- Click on "Settings" (repository settings)

- Click on "Deploy keys"
- Click on "Add deploy key"
- Enter a title, e.g. "Deploy key for sigrok-sync"
- Paste the content of the public key into the "key" text area
- Select "Allow write access"


Add private key to the source repository (sigrok-sync)
- Go the the Github page of the
sigrok-syncrepository - Click on "Settings" (repository settings)

- Click on "Secrets" and then on "Actions"
- Click on "New repository secret"
File:Source add key.png - Enter a name (Name is used in the Github workflow):
SSH_SYNCY_KEY - Paste the content of the private key into the "value" text area


