Difference between revisions of "AR488"
(AR488 serial port open and automatic firmware restart) |
(captions for updated DIY Nano images, drop dirty breadboard) |
||
| Line 19: | Line 19: | ||
File:Ar488-artag-pcb-top.png|<small>AR488 on PCB with Pro Micro</small> | File:Ar488-artag-pcb-top.png|<small>AR488 on PCB with Pro Micro</small> | ||
File:Ar488-artag-pcb-conn.png|<small>AR488 on PCB with Pro Micro</small> | File:Ar488-artag-pcb-conn.png|<small>AR488 on PCB with Pro Micro</small> | ||
File:ar488-diy-sniff-top.png|<small>AR488 wire wrap with Nano, top, GPIB and UART signals accessible for recording</small> | |||
File:ar488-diy-sniff-top.png|<small>AR488 wire wrap with Nano, top, signals accessible | |||
File:ar488-diy-sniff-bot.png|<small>AR488 wire wrap with Nano, bottom</small> | File:ar488-diy-sniff-bot.png|<small>AR488 wire wrap with Nano, bottom</small> | ||
</gallery> | </gallery> | ||
Revision as of 15:05, 13 August 2022
AR488 GPIB to UART/USB
The AR488 is an Arduino based GPIB to serial port adaptor. The firmware runs on UNO (and thus Nano), Mega as well as Leonardo boards. The PC sees a USB or RS232 attached COM port, transmit data is sent to the device, the device's response is seen as receive data. Out of band commands prefixed by ++ can control the adaptor's behaviour. The AR488 is accessible to interactive sessions in a terminal program, as well as can serve as a SCPI over serial "cable".
With one device per adapter (specific GPIB address and communication parameters stored in the AR488 adapter) support is transparent. When the adapter is connected to multiple devices at the same time, then "out of band" communication is required (the above mentioned ++ commands), which sigrok does not provide.
Hardware
- Arduino Uno or Nano (ATmega328p based), or Mega (ATmega2560 based), or Leonardo or Pro Micro (ATmega32u4 based)
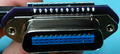
- Centronics 24pin connector
See the AR488-manual.pdf in the firmware source tree for schematics. Wires run from the Arduino board to the Centronics connector, no driver chips are involved. This keeps the component count low, the wiring simple, and the mechanical construction compact (especially with Nano boards which can execute the Uno firmware). In theory any bare serially attached ATmega chip would do, but the firmware happens to be written in the Arduino IDE's language (uses libraries and build support, won't work outside of the IDE without modifications).
The primary goal of the project is to enable quick access to GPIB attached devices. Typical use is to have one adapter per device (it's rather low cost, so that's not an issue). The lack of proper drivers means that the adapter cannot handle a full bus, the limit is said to be somewhere around three or four devices, before signals go out of spec and communication need not work reliably any longer. For larger setups with many devices a proper full-blown adapter with appropriate driving capabilities is recommended.
Photos
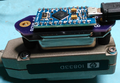
AR488 on PCB with Pro Micro
AR488 on PCB with Pro Micro
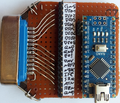
AR488 wire wrap with Nano, top, GPIB and UART signals accessible for recording
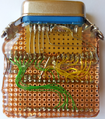
AR488 wire wrap with Nano, bottom


Protocol
See the AR488-manual.pdf document for a protocol description. The AR488 firmware passes the PC's outgoing data to the GPIB instrument, and the GPIB instrument's data to the PC. Commands start with the ++ prefix and affect the adapter's operation. AR488 firmware implements most of the Prologix commands, and a few more. Macros (both executed at runtime as well as at firmware start) are supported.
How to use the AR488 adapter:
- (Optional, see below) Modify the firmware to enable the macro feature and especially the startup macro (remove comment leaders from disabled defines).
 #define MACROS
 #define STARTUP
- (Optional, see below) Locate the startup_macro[] definition and adjust it to match your use case. Here is an example.
 ++addr 20
 ++auto 2
- (Optional, see below) Compile and upload the firmware into the adapter.
- (See above for custom firmware) Regular common firmware can interactively get configured and that configuration can get stored in the adapter. Which eliminates the necessity for custom builds, and ++ commands at the start of a session. See the AR488 manual which parameter values get stored and applied upon firmware startup.
 ++ addr 20
 ++ auto 2
 ++ savecfg
 ++ rst
- Open a terminal program and run a few commands.
 $ screen /dev/ttyUSB0 115200
 *idn?
 conf?
 read?
 ++repeat 15 4000 read?
- Use the adapter with GPIB aware applications, like sigrok's SCPI over serial.
$ sigrok-cli -d scpi-dmm:conn=/dev/ttyUSB0:serialcomm=115200 --scan
- Alternative mix of interactive and programmatic use.
 $ screen /dev/ttyUSB0 115200
 ++ addr 22
 ++ auto 2
 (close terminal session)
 $ sigrok-cli -d scpi-dmm:conn=/dev/ttyUSB0:serialcomm=115200
BEWARE! Depending on the specific implementation of the Arduino board, the adapter may restart when the serial port gets opened, and the volatile configuration may not take effect at all. This is an implementation detail of deriving a RESET signal from the DTR handshake, motivated by automatically entering bootloaders without the user's intervention. Consider the ++savecfg approach outlined above instead.
Resources
- Twilight Logic's github repo, contains firmware sources and documentation
- EEVBlog forum thread